Desserts & Baking
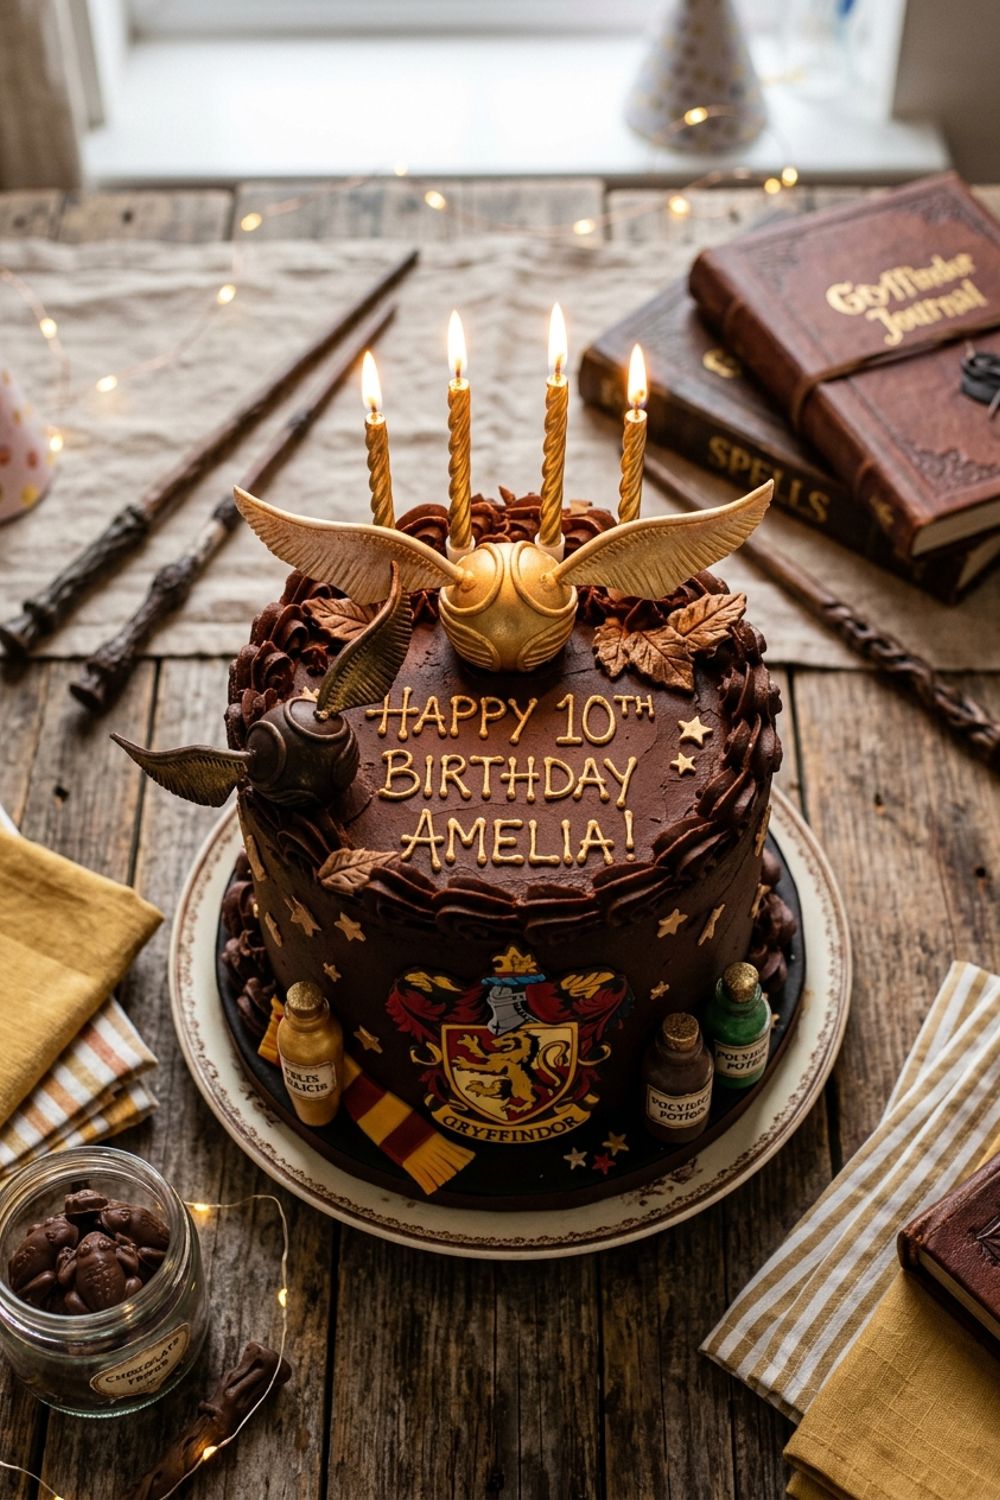
Harry Potter Birthday Cake
Why This Recipe Is Special
I have been a Harry Potter fan since I was twelve years old, and there is one scene from the very first book that has lived rent-free in my imagination for decades: Hagrid arriving at the hut on the rock, pulling a slightly squashed chocolate birthday cake from inside his enormous coat, and presenting it to an astonished Harry. The cake had green icing and pink letters that spelled “Happee Birthdae Harry.” In that moment, it was not just a cake — it was the first birthday present Harry ever received, the first act of genuine kindness from the wizarding world, and the beginning of everything.
I have baked this cake more times than I can count — for Harry Potter movie marathons, for book club meetings, for my own birthday (no shame), and for a few memorable Halloween parties. Over the years, I have refined the recipe to be as true to the spirit of the books as possible while also being genuinely, seriously delicious. This is not a novelty cake that looks cute but tastes like cardboard. The chocolate sponge is deeply chocolatey and impossibly moist, the ganache filling adds a layer of pure decadence, and the buttercream icing is rich, sweet, and the perfect shade of forest green.
What I love most about this cake is its imperfection. Hagrid was not a pastry chef — he was a half-giant with hands the size of dustbin lids, baking in a hut with a questionable oven. The cake should look homemade and a little rough around the edges. The icing should be slightly uneven, the pink lettering should be wobbly, and the whole thing should radiate warmth and love rather than professional polish. This is a cake that says “I care about you” more than “I went to culinary school.” And honestly, that makes it more beautiful than any fondant-smooth showpiece ever could be.
The Science Behind Moist Chocolate Cake
The secret to this cake’s extraordinary moisture is threefold: buttermilk, oil, and hot coffee. Each ingredient plays a specific role, and understanding why they work will help you nail the texture every time.
Buttermilk is acidic, and when it meets the baking soda in the batter, it creates carbon dioxide bubbles that give the cake a light, tender crumb. But the acidity does something else too — it weakens the gluten strands in the flour, resulting in a softer, more delicate texture than you would get with regular milk. If you do not have buttermilk, you can make a substitute by adding 1 tablespoon of white vinegar or lemon juice to 1 cup of milk and letting it sit for 5 minutes until it curdles.
Vegetable oil instead of butter might seem like a downgrade, but in chocolate cake, it is actually an upgrade. Butter is about 80% fat and 20% water, while oil is 100% fat. More fat means more moisture in the final cake. Butter also solidifies when cool, which can make a refrigerated cake feel dense and tight. Oil stays liquid at any temperature, so this cake remains soft and moist even after a night in the fridge. The trade-off is that butter contributes flavor while oil does not, but in a cake this loaded with chocolate and cocoa, the butter flavor would be lost anyway.
And then there is the hot coffee. I know it sounds strange, but coffee is the best friend chocolate ever had. The bitter compounds in coffee amplify the perception of chocolate flavor on your palate, making the cake taste more intensely chocolatey without adding any detectable coffee flavor. The heat of the coffee also blooms the cocoa powder, releasing its full aromatic potential. If you are making this for children or anyone who avoids caffeine, hot water works fine — you just lose that extra layer of chocolate intensity.
Perfecting the Green Buttercream
The green icing is arguably the most iconic visual element of this cake, and getting the right shade is more important than you might think. You are aiming for a rich, earthy forest green — the kind of green that Hagrid might have mixed from whatever food coloring he had in his kitchen. Definitely not neon green, not lime green, and not mint green. Think of the color of a spruce tree or a Slytherin scarf.
I strongly recommend gel food coloring rather than liquid. Gel colorings are much more concentrated, so you need very little to achieve a deep color without thinning the buttercream. Liquid food coloring requires so much volume to reach a deep green that it can make the icing runny and affect the texture. Add the gel coloring a few drops at a time, mixing thoroughly between additions, until you reach your desired shade. The color will deepen slightly as the buttercream sits, so stop just short of your target shade and let it rest for 10 minutes before deciding if you need more.
The buttercream itself is a straightforward American-style frosting — butter, powdered sugar, cream, and vanilla. The keys are to start with properly softened butter (it should yield easily to pressure but not be melty or greasy) and to sift the powdered sugar to avoid lumps. Beat the butter alone first for a full 3 minutes — this aerates it and creates a lighter, fluffier frosting. Add the sugar gradually and do not rush this step. If you dump all the sugar in at once, you will end up with a dense, overly sweet cement rather than light, spreadable buttercream. The cream and vanilla go in at the end, and a final 2-minute beat on high speed brings everything together into a silky, pipeable consistency.
Tips for Perfect Results
Use Dutch-process cocoa powder. Dutch-process (also called alkalized) cocoa is treated with an alkalizing agent that neutralizes its natural acidity, resulting in a darker color, smoother flavor, and richer chocolate taste. In a cake that is all about chocolate, this matters. Natural cocoa powder works but will give a lighter color and slightly sharper, more acidic chocolate flavor. Brands like Droste, Valrhona, and Ghirardelli all make excellent Dutch-process cocoa.
Bring your eggs and buttermilk to room temperature. Cold ingredients can cause the butter in the batter to seize up, creating a lumpy texture and uneven rise. Set the eggs and buttermilk on the counter 30 minutes before you start baking. If you forgot, place the eggs in a bowl of warm water for 10 minutes and microwave the buttermilk in 10-second bursts until it reaches room temperature.
Do not open the oven door during the first 25 minutes. The cake’s rise depends on the carbon dioxide from the baking soda and baking powder, and opening the door lets out the hot air that is setting the structure. A sudden temperature drop can cause the cake to sink in the center. After 25 minutes, you can quickly check by inserting a toothpick — it should come out with a few moist crumbs, not wet batter.
Level your cake layers. Most cakes dome slightly in the center during baking. Use a long serrated knife to carefully slice off the dome so each layer is flat. This ensures the cake stacks evenly and does not wobble or lean. Save the scraps — they make excellent cake pops or trifle components, or you can eat them as a baker’s treat (which is what I always do).
Embrace the imperfection. This is not a wedding cake. The icing should look like it was applied with love and enthusiasm by someone with very large hands. Use a regular offset spatula or even a butter knife, and do not stress about getting it smooth. Swoops, ridges, and slightly uneven patches add to the authenticity. When you write “Happee Birthdae Harry” in pink icing, make the letters a little wobbly and uneven — channel your inner Hagrid.
Variations to Try
The Harry Potter universe is full of incredible food moments, and this cake lends itself to some wonderful creative variations that stay true to the magical spirit.
Hagrid’s Rock Cakes: If you want a simpler Harry Potter bake, make Hagrid’s famous rock cakes. These are dense, craggy British scones studded with dried fruit and spices. They appear multiple times in the books and are supposed to be hard enough to break teeth — though my version is actually quite tender and delicious.
Butterbeer Cake Version: Replace the coffee in the batter with cream soda and add 1 teaspoon of butter extract. Make a butterscotch buttercream by beating 1/3 cup of butterscotch sauce into the frosting. Still ice it green for the authentic look, but the butterscotch flavor is a wonderful nod to the Wizarding World’s favorite beverage.
Vegan Harry Potter Cake: Replace the eggs with 1/2 cup unsweetened applesauce, use oat milk for the buttermilk (with vinegar), and swap the butter in the frosting for vegan butter. The cake is naturally dairy-free if you use water instead of buttermilk and oil instead of butter. The ganache can be made with coconut cream instead of heavy cream.
Individual Cauldron Cakes: Bake the batter in a muffin tin for 18-20 minutes to make individual “cauldron cakes,” a treat sold on the Hogwarts Express. Frost each one with green buttercream and add a small pink letter on top. Perfect for a Harry Potter party where everyone gets their own personal cake.
How to Store
The assembled cake keeps beautifully at room temperature, covered with a cake dome or loosely tented with foil, for up to 2 days. The buttercream acts as a sealant that locks in moisture, so the cake actually tastes even better on day two as the flavors meld. In warm weather (above 75°F / 24°C), refrigerate the cake and bring it to room temperature 30 minutes before serving for the best texture.
For longer storage, refrigerate the assembled cake for up to 5 days. The cold will firm up the buttercream and ganache, but the flavors and moisture remain excellent. Unfrosted cake layers can be wrapped tightly in plastic wrap and frozen for up to 3 months — thaw at room temperature for 2-3 hours before frosting. The buttercream can be made up to one week in advance and stored in an airtight container in the refrigerator; re-whip for 2 minutes before using to restore its fluffy texture.
Troubleshooting
The cake sank in the middle. The most likely cause is opening the oven door too early, underbaking, or too much leavening agent. Make sure your baking soda and baking powder are fresh (they lose potency after 6 months), and do not open the oven until at least 25 minutes have passed. The cake should spring back when gently pressed in the center.
The buttercream is too sweet. American buttercream is inherently sweet, but you can temper it by adding a pinch of salt and an extra splash of cream. Some people also add 2 tablespoons of cream cheese for a slight tang that balances the sweetness. If you find American buttercream too sweet in general, consider a Swiss meringue buttercream, though it is more difficult to color to a deep green.
The pink lettering is too runny. Add more powdered sugar, a teaspoon at a time, until the icing holds its shape when piped. It should be thick enough to hold a line but thin enough to flow through a small piping tip. Test on a plate before writing on the cake — you can always scrape it off the plate and adjust, but you cannot easily undo piped lettering on buttercream.
The ganache is grainy or seized. The cream was either too hot (boiling) or too cold. It should be just simmering — tiny bubbles around the edges. If the ganache has seized (turned thick and lumpy), add a tablespoon of warm cream and stir vigorously, or microwave in 10-second bursts, stirring between each. Another common cause is water accidentally getting into the chocolate, which causes it to seize.
This Harry Potter birthday cake is more than a recipe to me — it is a love letter to a story that shaped my childhood and still brings me joy as an adult. Every time I bake it, I feel a little bit of that magic that Harry felt when Hagrid knocked down the door of the hut on the rock and changed his life forever. I hope it brings the same warmth and wonder to your kitchen. Whether you are baking this for a Harry Potter party, a child’s birthday, or simply because you love the books as much as I do, know that every slice carries a little bit of magic with it. And if anyone asks why there are misspellings on the cake, you get to tell them the story of a half-giant with a heart of gold who baked a birthday cake in his coat pocket and changed a young wizard’s life forever. That story, I think, is the best ingredient of all.
Never Miss a Recipe
Join 5,000+ home cooks and get new recipes straight to your inbox.
Ingredients
Chocolate Sponge
Chocolate Ganache Filling
Green Buttercream Icing
Pink Lettering
Optional Decorations
Instructions
- 1
Prepare the Cake Pans
Preheat your oven to 350°F (175°C). Grease two 9-inch round cake pans with butter, line the bottoms with parchment paper circles, then grease the parchment and dust with cocoa powder, tapping out the excess. The cocoa powder prevents white flour streaks on the dark chocolate cake.
- 2
Mix the Dry Ingredients
In a large bowl, whisk together the flour, sugar, cocoa powder, baking soda, baking powder, and salt until evenly combined. Make a well in the center. It is important that the dry ingredients are thoroughly whisked to distribute the leavening agents evenly — this ensures a uniform rise with no dense pockets.
- 3
Combine Wet and Dry
Add the eggs, buttermilk, vegetable oil, and vanilla to the well in the dry ingredients. Beat on medium speed with an electric mixer for 2 minutes until smooth. With the mixer on low, carefully pour in the hot coffee and mix until just combined. The batter will be very thin — this is exactly right. The coffee intensifies the chocolate flavor without making the cake taste like coffee.
- 4
Bake the Layers
Divide the batter evenly between the two prepared pans. Bake at 350°F (175°C) for 30-35 minutes, until a toothpick inserted in the center comes out with just a few moist crumbs. Do not overbake — the cakes should feel slightly soft in the center as they will firm up as they cool. Let cool in the pans for 15 minutes, then turn out onto wire racks to cool completely, at least 1 hour.
- 5
Make the Ganache Filling
Place the chopped chocolate in a heatproof bowl. Heat the cream in a small saucepan until it just begins to simmer — small bubbles around the edges, not a full boil. Pour the hot cream over the chocolate and let it sit for 2 minutes without stirring. Add the butter, then stir gently from the center outward until completely smooth and glossy. Let cool to a spreadable consistency, about 30 minutes at room temperature.
- 6
Make the Green Buttercream
Beat the softened butter with an electric mixer on medium-high speed for 3 minutes until pale and fluffy. Add the powdered sugar one cup at a time, beating on low after each addition. Add the cream and vanilla, then beat on high for 2 minutes until light and smooth. Add green gel food coloring a few drops at a time, mixing after each addition, until you reach a rich forest green. Think Slytherin green, not neon green — earthy and slightly muted.
- 7
Assemble and Decorate
Level the cake layers with a serrated knife if they domed. Place the first layer on a cake board or plate. Spread the chocolate ganache evenly over the top. Place the second layer on top and press gently. Cover the entire cake — top and sides — with the green buttercream using an offset spatula. For the iconic look, keep the icing slightly rough and imperfect, as Hagrid would have done. For the pink lettering, mix powdered sugar, milk, and pink food coloring into a thick but pipeable icing. Transfer to a small piping bag fitted with a round tip and write 'Happee Birthdae Harry' (with Hagrid's intentional misspellings) across the top of the cake.
Nutrition Information
Per serving (serves 12). Values are approximate.
| Calories | 520 calories |
| Total Fat | 26g |
| Saturated Fat | 14g |
| Carbohydrates | 68g |
| Sugar | 52g |
| Protein | 6g |
| Sodium | 380mg |
| Fiber | 2g |
* Percent Daily Values are based on a 2,000 calorie diet. Your daily values may be higher or lower depending on your calorie needs. Nutritional information is an estimate and may vary.
Frequently Asked Questions
Can I skip the coffee in the cake batter?
Yes, replace the hot coffee with hot water. The cake will still be delicious, but the coffee amplifies the chocolate flavor without adding any coffee taste. Even people who dislike coffee cannot detect it in the finished cake — it simply makes the chocolate taste more chocolatey.
Can I make this cake in advance?
The unfrosted cake layers can be baked, wrapped tightly in plastic wrap, and stored at room temperature for 1 day or in the freezer for up to 3 months. The buttercream can be made up to a week ahead and refrigerated — just bring it to room temperature and re-whip before using. Assemble and decorate the day you plan to serve.
Why does the batter seem so thin?
The hot coffee makes the batter quite liquid, which is normal. This thin batter creates an incredibly moist, tender crumb. Do not try to thicken it by adding more flour — trust the process. The cakes will set up perfectly in the oven.
How do I get the misspellings right for Hagrid's writing?
In the book, Hagrid's cake reads 'Happee Birthdae Harry' — with 'ee' instead of 'y' in Happy and 'ae' instead of 'ay' in Birthday. Write it in slightly wobbly letters with a round piping tip to capture Hagrid's endearing lack of finesse. The imperfection is the charm.

Hi, I'm Lisa!
I create simple, tested recipes from around the world that anyone can make at home.
Learn More →Reader Reviews
Based on 276 reviews