World Cuisine
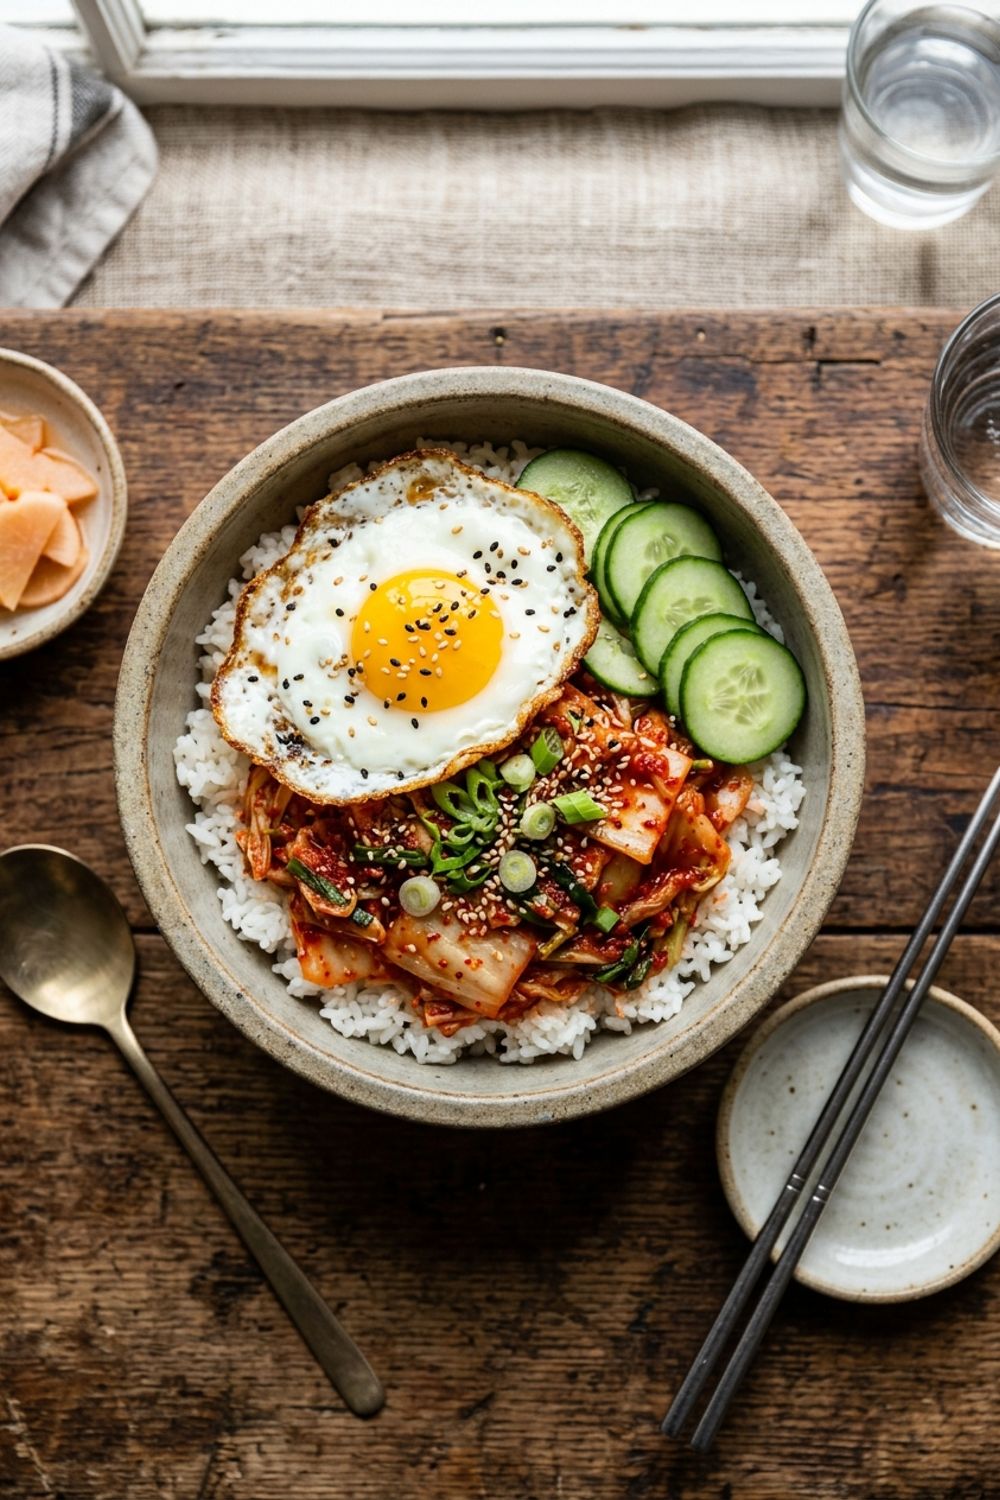
Fermented Cabbage Kimchi Bowl
Why This Fermented Cabbage Kimchi Bowl Is My Go-To Comfort Meal
I still remember the first time I tasted authentic kimchi at a tiny hole-in-the-wall restaurant in Seoul’s Myeongdong district. The tang, the crunch, the slow burn of gochugaru on my tongue — it was like nothing I had ever experienced. That single bite turned me into a lifelong devotee of Korean fermented foods, and I have been perfecting my own kimchi recipe ever since.
What makes this kimchi bowl truly special is the balance it strikes between the sour, spicy punch of the fermented cabbage and the comforting warmth of freshly steamed rice. I love how the runny egg yolk creates this incredible sauce that ties everything together when you break it open and mix it into the bowl. It is one of those meals that feels deeply nourishing on every level — satisfying your hunger, warming your belly, and exciting your taste buds all at once.
I designed this recipe to be approachable for anyone, whether you are a complete beginner to Korean cooking or someone who has been making kimchi for years. The fermentation process might sound intimidating, but I promise you it is one of the simplest and most rewarding kitchen projects you will ever undertake. You are essentially letting salt, time, and beneficial bacteria do all the heavy lifting while you focus on preparing a beautiful bowl of toppings.
Over the years, I have served this kimchi bowl to friends from all walks of life, and it consistently wins over even the most skeptical eaters. There is something about the combination of textures — the sticky rice, the crunchy cabbage, the silky egg, the crisp cucumber — that makes every single bite interesting. I truly believe this is one of those recipes that will become a staple in your weekly rotation once you try it.
The Art of Proper Cabbage Fermentation
Understanding the science behind kimchi fermentation has completely transformed how I approach this recipe. When you salt the napa cabbage, you are doing two critical things simultaneously: drawing out excess moisture that would make your kimchi watery, and creating an environment where beneficial lactobacillus bacteria can thrive while harmful bacteria cannot survive. This is why the quality of your salt matters — I always use coarse sea salt because it dissolves more slowly and draws out moisture more gradually, resulting in a crunchier final product.
The temperature of your fermentation environment plays a huge role in the final flavor. I have found that fermenting at around 68-72 degrees Fahrenheit produces the best balance of tang and depth. If your kitchen runs warmer, the fermentation will happen faster, sometimes in as little as 12 hours. In cooler environments, you might need to wait up to 3 days. I always taste my kimchi twice a day during fermentation — when it has a pleasant effervescence and a sharp tanginess that makes your mouth water, it is ready for the fridge.
One technique that I learned from a Korean grandmother during my travels is to press the kimchi down firmly after packing it into the jar. This ensures that the vegetables are submerged in their own brine, which prevents mold from forming on the surface. I also place a small piece of plastic wrap directly on top of the kimchi before sealing the jar, creating an extra barrier against unwanted microorganisms. These small details make the difference between good kimchi and extraordinary kimchi.
Building the Perfect Rice Foundation
The rice in a kimchi bowl is not just a filler — it is the canvas upon which all the other flavors paint their masterpiece. I am very particular about my rice preparation because I believe it makes or breaks the entire dish. The first step that many people skip is rinsing the rice thoroughly. I wash my short-grain rice at least three to four times until the water runs almost completely clear. This removes excess surface starch that would otherwise make the rice gummy and clumpy instead of tender and individually distinct.
The ratio of water to rice is something I have tweaked many times over the years. For short-grain rice destined for a kimchi bowl, I use a ratio of 1.25 cups of water to 1 cup of rice. This produces grains that are sticky enough to pick up with chopsticks but not so wet that they turn into a porridge when the kimchi juice seeps in. After the rice finishes cooking, I always let it rest covered for a full 10 minutes — this steaming period is crucial for the starches to set up properly.
The sesame oil drizzle at the end is my secret weapon. Not only does it add a gorgeous nutty aroma to the rice, but it also creates a thin coating on each grain that prevents it from immediately absorbing all the liquid from the kimchi and toppings. This means your bowl stays beautifully layered instead of turning into a mushy mess by the time you reach the bottom. I use toasted sesame oil specifically because its deeper, more robust flavor stands up to the powerful kimchi flavors.
Tips for Perfect Kimchi Bowl Results
Use the Freshest Napa Cabbage You Can Find. The quality of your cabbage directly determines the quality of your kimchi. I look for heads that feel heavy for their size with tightly packed, crisp leaves that are white at the base and pale green at the tips. Avoid any cabbage with brown spots, wilted outer leaves, or a sour smell. Fresh napa cabbage has a mild, slightly sweet aroma and a satisfying crunch when you snap a leaf. If possible, buy from an Asian grocery store where the turnover is higher and the cabbage is more likely to be freshly stocked.
Do Not Rush the Salting Process. I know it is tempting to shortcut the 1.5 to 2-hour brining time, but this step is absolutely essential. The salt needs time to penetrate the thick white parts of the cabbage while gently wilting the thinner green portions. If you under-salt or rush the process, you will end up with kimchi that ferments unevenly — some pieces will be sour while others taste raw. You can test if the cabbage is ready by bending a thick white piece — it should flex easily without snapping.
Control Your Gochugaru Quality. Not all gochugaru is created equal, and this is the single most important ingredient in your kimchi paste. I exclusively use sun-dried Korean gochugaru with a vibrant red color and a slightly sweet, smoky aroma. The flakes should feel slightly oily to the touch, not dusty or papery. Good gochugaru provides complex flavor — sweetness, smokiness, and a gradual heat — while cheap substitutes taste sharp and one-dimensional. Look for packages labeled “taeyangcho” which indicates sun-dried processing.
Perfect Your Egg Technique. A fried egg with a runny yolk is non-negotiable in my kimchi bowl. The trick is to use medium heat and a well-oiled non-stick pan. I crack my eggs into a small bowl first, then gently slide them into the pan to avoid breaking the yolk. Cover the pan with a lid for the last minute of cooking to set the whites on top without overcooking the yolk. When you press the white gently near the yolk, it should jiggle like a water balloon. That liquid gold is the secret sauce of this entire dish.
Season in Layers. Rather than dumping all the sesame oil and sauce on at the end, I season at every stage. The rice gets its sesame oil, the kimchi brings its own fermented funk, the egg gets a pinch of flaky sea salt, and then the final drizzle of gochujang or sriracha ties everything together. This layered approach means every bite is complex and interesting rather than uniformly salty or spicy.

Variations to Try
Kimchi Fried Rice Bowl. Instead of serving the kimchi raw over steamed rice, chop it finely and stir-fry it with day-old rice in a smoking hot wok with a tablespoon of butter and a splash of soy sauce. The kimchi caramelizes beautifully, developing a deep umami crust on the rice. Top with a fried egg and sliced scallions for what I consider the ultimate late-night comfort meal. This variation works especially well with kimchi that has been fermenting for two or more weeks and has developed a very strong sour flavor.
Tofu Kimchi Bowl. For a protein-packed vegetarian version, I press extra-firm tofu for 30 minutes, cube it into 1-inch pieces, and pan-fry in sesame oil until golden and crispy on all sides. The crunchy tofu cubes paired with tangy kimchi and sticky rice create an incredible textural contrast. I make the kimchi with soy sauce instead of fish sauce and add a tablespoon of miso paste for extra depth. This version has become one of my most requested recipes among my plant-based friends.
Spicy Pork Kimchi Bowl. Marinate thinly sliced pork belly in a mixture of gochujang, soy sauce, garlic, and a touch of honey for at least 30 minutes. Grill or pan-fry the pork until caramelized and slightly charred, then arrange it alongside the kimchi and rice. The sweet and savory pork plays off the tangy kimchi in the most addictive way. This heartier version is perfect for dinner parties and always disappears within minutes.
Seafood Kimchi Bowl. Toss fresh shrimp or squid in a light coating of gochugaru and sesame oil, then sear them over high heat until just cooked through. The briny sweetness of seafood pairs remarkably well with the funky fermented cabbage. I add a handful of wakame seaweed to the bowl and drizzle with a ponzu-sesame dressing for a fusion twist that bridges Korean and Japanese flavors beautifully.
How to Store Your Kimchi and Leftovers
Proper storage is key to maintaining the quality of both your kimchi and assembled bowls. The kimchi itself should be stored in an airtight glass jar in the refrigerator, where it will continue to ferment slowly and develop deeper flavor over time. I find that my kimchi hits its peak flavor at about two to three weeks in the fridge, though it remains perfectly good for up to three months. Always use clean utensils when scooping out kimchi to prevent introducing unwanted bacteria.
For the assembled bowls, I recommend eating them immediately for the best texture and flavor experience. However, if you must store leftovers, keep the components separate. Store the rice in an airtight container in the fridge for up to 3 days, and reheat it with a splash of water in the microwave. The fried egg does not store well, so I always cook eggs fresh. The sliced vegetables can be prepped ahead and stored in separate containers in the fridge for up to 2 days. When meal prepping, I prepare the rice and kimchi in advance but assemble the bowls just before eating.
Troubleshooting Common Kimchi Issues
If your kimchi tastes too salty after fermentation, it likely was not rinsed thoroughly enough after the brining step. I always rinse my cabbage three full times under cold running water and taste a piece before proceeding. If it is still salty, give it a fourth rinse. You can also soak the salted cabbage in fresh water for 15 minutes to draw out additional salt. Remember that the fish sauce and soy sauce in the paste also add saltiness, so the cabbage itself should taste only mildly salty before mixing.
If your kimchi develops white spots or a fuzzy white coating on the surface, this is usually kahm yeast, which is harmless but can add an off flavor. Simply scrape it off and push the remaining kimchi back below the brine level. To prevent this, always make sure your kimchi is fully submerged and the jar is sealed properly. If the kimchi develops any pink, black, or green mold, discard it entirely. This typically happens when the jar was not clean or the cabbage was not brined long enough to create the proper acidic environment.
If the kimchi is not fermenting and remains tasteless after two days at room temperature, your kitchen may be too cold. Move the jar to a warmer spot, such as on top of the refrigerator or near a warm appliance. You can also add a pinch of sugar to jump-start the fermentation process. Conversely, if the kimchi is fermenting too quickly and becoming overly sour within 24 hours, your environment is too warm. Move the jar to the refrigerator sooner to slow down the process.
This fermented cabbage kimchi bowl has become one of my most-loved recipes, and I hope it brings the same joy to your kitchen that it brings to mine. If you enjoy bold Korean flavors, you will love pairing this with my Cabbage Dumplings Gyoza for a complete Asian-inspired feast. For something completely different but equally comforting, try my Homemade Butter Chicken or my warming Thai Coconut Red Lentil Soup.
Never Miss a Recipe
Join 5,000+ home cooks and get new recipes straight to your inbox.
Ingredients
Kimchi Base
Rice Bowl
Instructions
- 1
Prepare the Cabbage
Cut the napa cabbage lengthwise into quarters, then chop each quarter crosswise into 2-inch pieces. Place the cabbage in a large bowl and sprinkle evenly with the coarse sea salt. Toss and massage the salt into the cabbage leaves for about 2 minutes. Pour the cold water over the cabbage, ensuring all pieces are submerged. Let it sit at room temperature for 1 1/2 to 2 hours, turning the cabbage halfway through.
- 2
Make the Kimchi Paste
While the cabbage is brining, combine the gochugaru, fish sauce, soy sauce, sugar, minced garlic, and grated ginger in a medium bowl. Stir until a smooth, vibrant red paste forms. Add the sliced scallions and mix gently to combine. Set aside.
- 3
Combine and Ferment
Drain the cabbage thoroughly and rinse under cold running water three times to remove excess salt. Squeeze out as much water as possible. Transfer the cabbage to a large mixing bowl and add the kimchi paste. Using gloves, massage the paste into every leaf until evenly coated. Pack the kimchi tightly into a clean glass jar, pressing down to remove air pockets. Leave about 1 inch of headspace. Seal loosely and let ferment at room temperature for 1-2 days, then refrigerate.
- 4
Cook the Rice
Rinse the short-grain rice under cold water until the water runs clear, about 3-4 rinses. Combine the rice and 2 1/2 cups water in a medium saucepan. Bring to a boil over high heat, then reduce to low, cover, and simmer for 15 minutes. Remove from heat and let steam, covered, for an additional 10 minutes. Fluff with a fork and drizzle with 1 tablespoon of sesame oil.
- 5
Prepare the Toppings
Heat the vegetable oil in a non-stick skillet over medium heat. Crack the eggs into the pan and fry until the whites are set but the yolks remain runny, about 3-4 minutes. Slice the cucumber and julienne the carrot. Toast the sesame seeds in a dry pan over medium heat for 1-2 minutes until golden and fragrant.
- 6
Assemble the Bowls
Divide the warm rice among four bowls. Top each with a generous portion of kimchi (about 1/2 cup per bowl), sliced cucumber, julienned carrot, and a fried egg. Drizzle with the remaining sesame oil and sriracha or gochujang. Garnish with toasted sesame seeds and nori strips. Serve immediately.
Nutrition Information
Per serving (serves 4). Values are approximate.
| Calories | 380 calories |
| Total Fat | 14g |
| Saturated Fat | 3g |
| Carbohydrates | 48g |
| Sugar | 6g |
| Protein | 16g |
| Sodium | 850mg |
| Fiber | 4g |
* Percent Daily Values are based on a 2,000 calorie diet. Your daily values may be higher or lower depending on your calorie needs. Nutritional information is an estimate and may vary.
Frequently Asked Questions
How long does homemade kimchi need to ferment?
For best flavor, ferment your kimchi at room temperature for 1-2 days, then transfer to the refrigerator. It will continue to develop flavor over the next 1-2 weeks in the fridge. Taste it daily to find your preferred level of tanginess.
Can I make this bowl without fish sauce?
Yes! For a vegetarian version, substitute the fish sauce with 3 tablespoons of soy sauce mixed with 1 teaspoon of miso paste. The flavor profile will be slightly different but still delicious and umami-rich.
What type of rice works best for kimchi bowls?
Short-grain white rice or sushi rice works best because its sticky texture pairs perfectly with the tangy kimchi. You can also use short-grain brown rice for added fiber, though you will need to increase the cooking time by about 15 minutes.
How spicy is this kimchi recipe?
With 1/4 cup of gochugaru, this recipe has a moderate heat level. For milder kimchi, reduce the gochugaru to 2 tablespoons. For extra heat, add 1-2 minced Thai chilies to the paste.

Hi, I'm Lisa!
I create simple, tested recipes from around the world that anyone can make at home.
Learn More →Reader Reviews
Based on 245 reviews