Holiday & Christmas
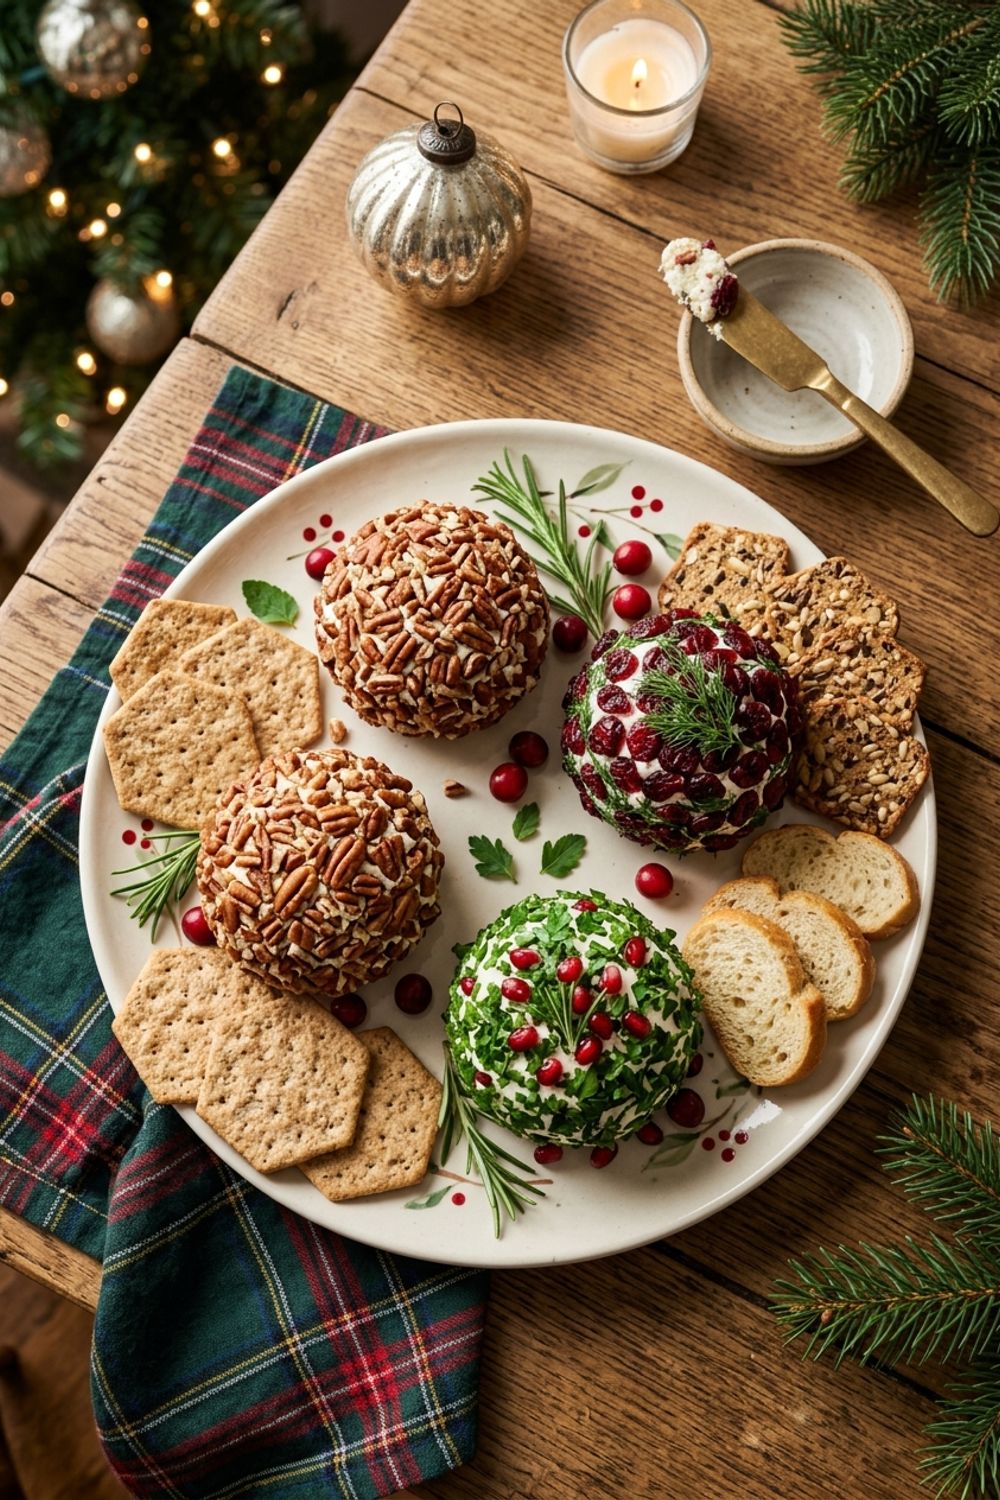
Christmas Cheese Balls
Why These Christmas Cheese Balls Are Special
I have been making cheese balls for holiday parties since I was old enough to reach the kitchen counter. My mom always had one at every Christmas gathering — a big, round ball of cheese coated in chopped nuts, sitting on a plate surrounded by Ritz crackers. It was simple, it was retro, and it was absolutely delicious. But over the years, I have modernized the concept while keeping everything that made it great, and this three-ball recipe is the result of that evolution.
What makes this recipe stand out is the variety. Instead of one large cheese ball with one coating, you get three distinct cheese balls with three different coatings — cranberry pecan for sweet and nutty, fresh herbs for bright and garden-fresh, and everything bagel seasoning for savory and crunchy. This means your platter has visual variety, flavor diversity, and something for every preference at the table. The cranberry pecan ball is the holiday star with its festive red and brown exterior. The herb ball is gorgeously green, like a little grassy globe. And the everything bagel ball is the crowd-pleaser that tastes like a warm bagel with cream cheese in every bite.
The base cheese mixture is what ties all three balls together, and I have spent years perfecting it. The combination of cream cheese and sharp cheddar gives you creaminess and tang. The Worcestershire sauce adds an umami depth that makes people say “what is that flavor?” without being able to identify it. The smoked paprika and cayenne bring a gentle warmth that lingers behind each bite. And the sour cream keeps everything moist and spreadable, even after the cheese balls have been refrigerated. It is the kind of recipe where every ingredient has a purpose and nothing is superfluous.
The Science of a Perfect Cheese Ball Texture
Getting the texture right is the difference between a cheese ball that spreads beautifully onto a cracker and one that is either too hard to cut or too soft to hold its shape. Understanding what affects the texture helps you nail it every single time, regardless of your kitchen conditions.
The cream cheese is the structural foundation. At room temperature, cream cheese is soft and workable, which allows it to blend smoothly with the shredded cheddar and spices. But it firms up significantly when chilled, which is what gives the cheese ball its shape. This is why the recipe has two chilling steps — one after mixing (to firm up for shaping) and one after coating (to set the coating in place). Both are important and should not be skipped.
The shredded cheddar adds body, flavor, and texture. I use finely shredded cheddar rather than chunky shreds because fine shreds integrate more evenly into the cream cheese, creating a smoother texture with no lumpy pockets. The cheddar also absorbs some of the moisture from the cream cheese and sour cream, which helps the ball hold its shape. Use a sharp or extra-sharp cheddar for the best flavor — mild cheddar tends to get lost behind the spices.
The sour cream is my secret ingredient for texture. Without it, the cheese ball can be quite dense and stiff straight from the fridge, requiring aggressive knife-work to spread on a cracker. The sour cream introduces just enough additional moisture to keep the ball pleasantly soft and spreadable even when cold. It also adds a subtle tanginess that complements the cheddar beautifully. Do not exceed the 1/4 cup measurement though — too much sour cream makes the mixture too loose to shape.
Temperature management is critical throughout the process. Mix the cheese at room temperature for the smoothest blend. Chill it until firm enough to shape (at least 30 minutes — I find 45 minutes ideal). Shape quickly so your hands do not warm it up too much. Coat immediately after shaping. Then chill again to set the coating. Before serving, let the ball sit out for 10 to 15 minutes so it softens to that perfect sweet spot between firm and spreadable.
Crafting Three Signature Coatings
Each coating is designed to complement the savory, tangy cheese base while creating a visually distinct presentation. I put a lot of thought into the flavor pairings and textures of each coating, and I want to share the reasoning behind my choices.
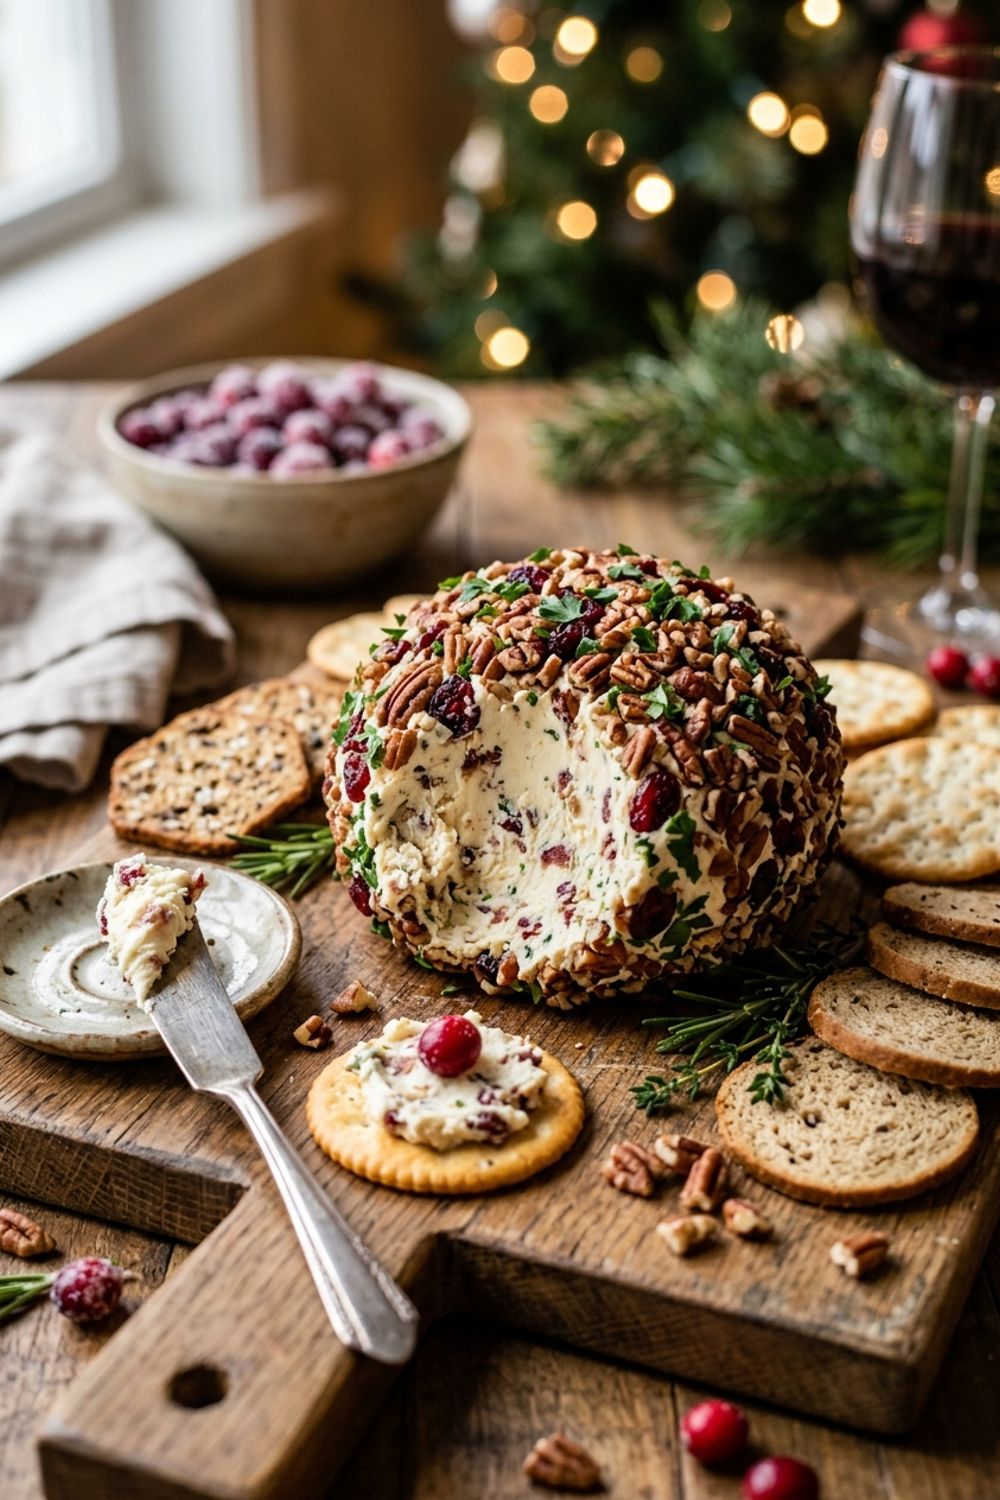
The cranberry pecan coating is the most Christmassy of the three. The dried cranberries bring a chewy, sweet-tart element that contrasts beautifully with the rich, savory cheese. I chop them finely so they adhere evenly and create a bumpy, jewel-toned texture on the surface. The pecans add crunch and a buttery, toasted flavor that pairs naturally with both the cranberries and the cheddar in the cheese base. The minced fresh rosemary is the surprise element — it adds an aromatic, piney note that smells like Christmas and ties the cranberry and pecan flavors together.
The fresh herb coating is the brightest and most vibrant of the three. Parsley provides the bulk of the green color and a mild, grassy flavor. Chives add a delicate onion note that complements the onion powder in the cheese base. Dill brings a fresh, slightly anise-like quality that makes the ball taste light and garden-fresh. Thyme adds an earthy depth and tiny visual interest with its small leaves. Together, these four herbs create a coating that looks like a ball rolled through a herb garden and tastes just as fresh.
The everything bagel coating is hands-down the most popular with guests. Everything bagel seasoning is a magical combination of sesame seeds, poppy seeds, dried garlic, dried onion, and salt that tastes exactly like the top of your favorite bakery bagel. I supplement the store-bought seasoning with extra sesame seeds and dried minced onion for a thicker, more generous coating. When spread on a cracker, this ball tastes like cream cheese on an everything bagel — a flavor combination so beloved that it basically sells itself.
Tips for Perfect Christmas Cheese Balls
Shred your own cheese for the best melt and blend. Pre-shredded cheese from a bag is coated in anti-caking agents (usually cellulose or potato starch) that prevent it from melting and blending smoothly into the cream cheese. Shredding a block of cheddar yourself takes 2 minutes with a box grater and gives you a dramatically smoother, creamier cheese ball. Use the finest side of the grater for the best results.
Work quickly when shaping. The warmth of your hands will soften the cheese mixture rapidly, making it increasingly difficult to form a round ball. I scoop the chilled mixture out of the bowl, give it a quick five to six rolls between my palms to form a sphere, and immediately place it on the coating plate. The entire shaping process for each ball should take no more than 15 to 20 seconds. If the mixture gets too soft, pop it back in the fridge for 10 minutes.
Press the coating firmly and evenly. A common mistake is rolling the cheese ball too lightly across the coating, resulting in patchy coverage with bare spots. Roll firmly with gentle pressure, then use your hands to press any loose coating pieces into the surface. I rotate the ball slowly, pressing from all angles, until the coverage is complete and uniform. Any bare spots will show the pale cheese underneath and break the visual impact.
Let the flavors develop overnight. While you can serve these cheese balls after just 15 minutes of final chilling, they taste significantly better after sitting in the refrigerator for 12 to 24 hours. During that time, the Worcestershire sauce, garlic, and spices permeate the cheese more deeply, and the flavors round out and meld together. I always make my cheese balls the day before the party for this reason.
Serve on a board with crackers already arranged. Do not just put the cheese ball on a plate with a box of crackers next to it. Take 2 minutes to arrange crackers in fans and rows around the cheese balls on a wooden board. Add celery sticks, pretzel crisps, and sliced baguette for variety. Place a cheese knife or spreader next to each ball. This small effort in presentation transforms a humble cheese ball into an impressive appetizer display.
Variations to Try
Bacon Ranch Cheese Ball. Cook 6 strips of bacon until crispy, then chop finely. Add 2 tablespoons of ranch seasoning to the base cheese mixture. Shape into a ball and coat with the chopped bacon mixed with 2 tablespoons of finely chopped chives. This version is rich, smoky, and irresistible. Serve with sturdy crackers that can handle the generous spreading everyone will do.
Pineapple and Ham Cheese Ball. Add 1/2 cup well-drained crushed pineapple and 1/2 cup finely diced ham to the base cheese mixture. Coat with 1 cup of finely chopped macadamia nuts or toasted almonds. This sweet-savory combination has a retro charm that feels especially festive during the holidays. The pineapple adds moisture, so chill the mixture for a full hour before shaping.
Spicy Jalapeño Cheese Ball. Add 1/4 cup finely diced pickled jalapeños (drained) and swap the regular cheddar for pepper jack in the base mixture. Coat with crushed tortilla chips mixed with 1 tablespoon of chili powder. Serve with corn chips and warm salsa on the side. This bold, spicy version is perfect for guests who like a kick.
Dark Chocolate and Port Cheese Ball. For a dessert cheese ball, mix 8 oz cream cheese with 4 oz softened goat cheese, 3 tablespoons powdered sugar, and 2 tablespoons port wine. Coat with 1 cup of finely chopped dark chocolate and 1/4 cup of crushed gingersnap cookies. Serve with vanilla wafers and fresh pear slices. This sophisticated dessert version is perfect for a holiday after-dinner spread.
How to Store Christmas Cheese Balls
Uncoated cheese mixture can be stored in the refrigerator in an airtight container for up to 5 days. This is a great make-ahead strategy — mix the base well in advance and shape and coat the day before or the morning of your party for the freshest coating appearance.
Fully coated cheese balls wrapped individually in plastic wrap keep for 3 to 5 days in the refrigerator. The cranberry pecan and everything bagel coatings hold up the best over time. The herb coating will darken slightly after 2 days as the fresh herbs oxidize, so if appearance is critical, coat the herb ball closer to serving time.
For freezing, wrap each uncoated cheese ball in plastic wrap, then aluminum foil, and place in a freezer-safe bag. They freeze well for up to 1 month. Thaw overnight in the refrigerator. Apply the fresh herb coating after thawing. The cranberry pecan and everything bagel coatings can be applied before freezing without issues.
Troubleshooting Common Issues
The cheese ball is crumbling and will not hold together. The mixture is too dry. Add an extra tablespoon of sour cream and mix thoroughly. This usually happens when the cheddar was pre-shredded (with anti-caking agents that absorb moisture) or when the cream cheese was not fully softened before mixing. Ensure your cream cheese is truly soft — leaving it on the counter for a full hour is better than just 15 minutes.
The coating is falling off after refrigeration. The coating was not pressed firmly enough into the cheese surface, or the cheese ball was too cold when you applied the coating. The cheese surface should be slightly tacky — if it is ice-cold and dry, the coating has nothing to stick to. Let the shaped ball sit at room temperature for 2 minutes before rolling in the coating so the surface develops a slight tackiness.
The cheese ball tastes bland. The Worcestershire sauce and spices may not have had time to develop. Taste the mixture before chilling and adjust the salt and cayenne if needed. The mixture should taste slightly more seasoned than you think is necessary, because the chilling and the coating will mute the flavors slightly. A generous pinch of salt after shaping can also help.
The cheese ball is too soft and flat on the platter. It was not chilled long enough, or your kitchen is too warm. Place the finished cheese ball back in the refrigerator for another 30 minutes. For the long term, serve on a cold plate (chill the plate in the fridge for 10 minutes beforehand) and keep the cheese ball away from heat sources like candles or warming trays.
The everything bagel seasoning is too salty. Some store-bought everything bagel seasonings are saltier than others because different brands use different ratios of salt to seeds. If you find it too salty after coating, you can make your own blend by mixing 1 tablespoon each of sesame seeds, poppy seeds, dried minced garlic, and dried minced onion with just 1/2 teaspoon of flaky sea salt. This homemade version lets you control the sodium level precisely and often tastes fresher than the pre-made versions.
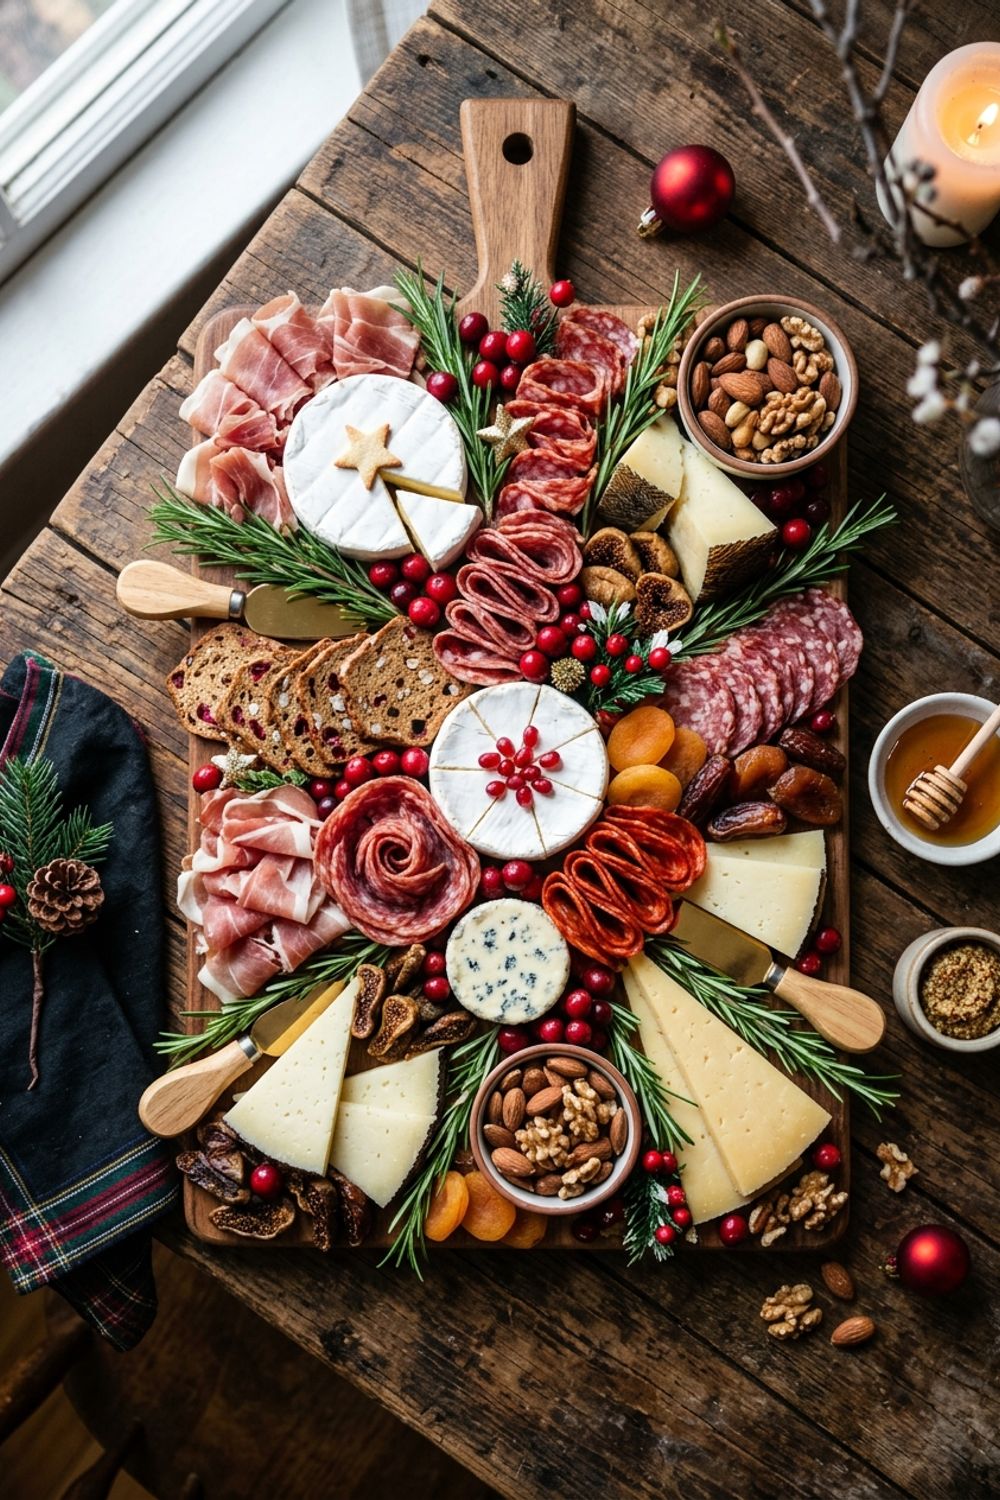
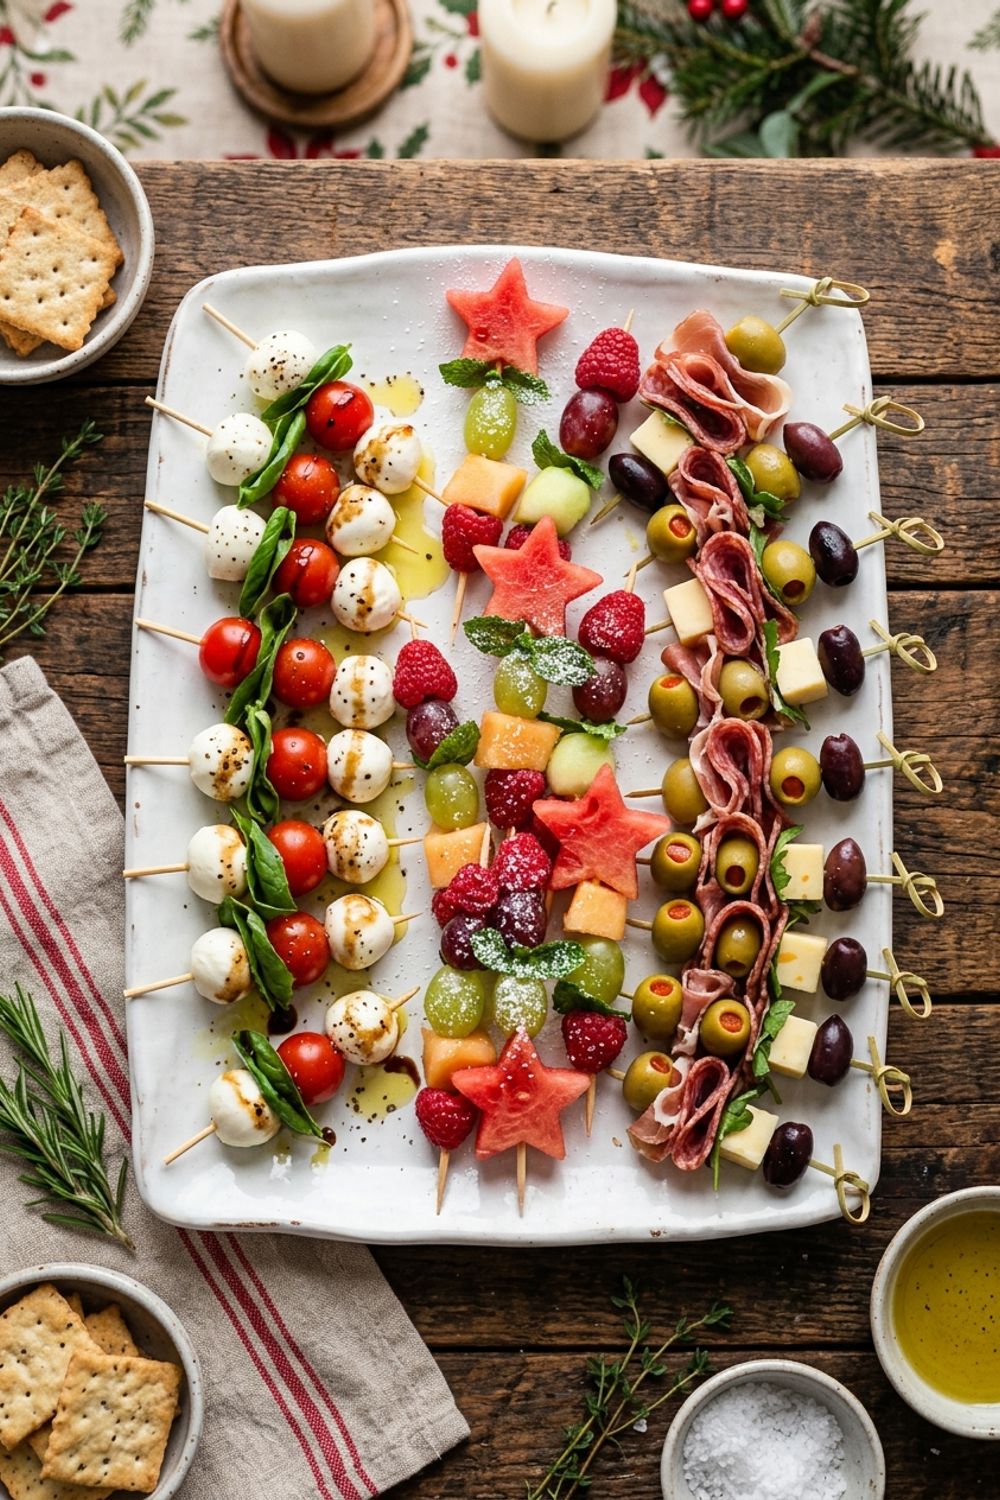
These cheese balls have earned a permanent spot on my holiday appetizer lineup, and I know they will earn one on yours too. For a complete holiday appetizer spread, serve these cheese balls alongside my christmas meat and cheese board and my christmas appetizer skewers. And for dessert, my churro cheesecake recipe is another cream-cheese-based holiday showstopper that your guests will adore.
Never Miss a Recipe
Join 5,000+ home cooks and get new recipes straight to your inbox.
Ingredients
Base Cheese Mixture
Cranberry Pecan Coating
Fresh Herb Coating
Everything Bagel Coating
For Serving
Instructions
- 1
Make the Base Cheese Mixture
In a large bowl, beat the softened cream cheese with an electric mixer on medium speed until smooth, about 2 minutes. Add the shredded cheddar, sour cream, Worcestershire sauce, garlic powder, onion powder, smoked paprika, cayenne pepper, and salt. Beat on low speed until everything is thoroughly combined and no streaks of cheddar remain. The mixture should be smooth but thick enough to hold its shape.
- 2
Chill the Mixture
Cover the bowl with plastic wrap and refrigerate for at least 30 minutes, up to 2 hours. This chilling step firms up the mixture so it is easy to shape into balls. Trying to shape warm, soft cheese mixture results in a sticky mess that does not hold its form. While the mixture chills, prepare the three coatings.
- 3
Prepare the Coatings
Combine the cranberry pecan coating ingredients on a large plate and mix together. Combine the fresh herb coating ingredients on a second plate and mix. Combine the everything bagel coating ingredients on a third plate and mix. Spread each coating into an even layer on its plate for easy rolling.
- 4
Shape the Cheese Balls
Divide the chilled cheese mixture into three equal portions, about 1 cup each. Using clean hands, roll each portion into a smooth, round ball. Work quickly — the warmth of your hands will soften the cheese. If the mixture becomes too sticky, wet your hands slightly with cold water. Each ball should be about the size of a large orange, roughly 3 to 4 inches in diameter.
- 5
Coat the Cheese Balls
Roll the first cheese ball in the cranberry pecan coating, pressing gently so the coating adheres evenly all over the surface. Roll the second ball in the fresh herb coating, pressing the herbs firmly into the cheese. Roll the third ball in the everything bagel coating, ensuring complete coverage. Use your hands to gently press any loose coating into place.
- 6
Final Chill and Serve
Place the coated cheese balls on a serving board or platter. Refrigerate for at least 15 minutes to firm up the coating and let the flavors meld. Before serving, bring the cheese balls to room temperature for 10 to 15 minutes — this softens the cheese to the perfect spreadable consistency. Surround with assorted crackers, sliced baguette, celery sticks, and pretzel crisps.
Nutrition Information
Per serving (serves 16). Values are approximate.
| Calories | 195 calories |
| Total Fat | 16g |
| Saturated Fat | 9g |
| Carbohydrates | 6g |
| Sugar | 3g |
| Protein | 7g |
| Sodium | 340mg |
| Fiber | 1g |
* Percent Daily Values are based on a 2,000 calorie diet. Your daily values may be higher or lower depending on your calorie needs. Nutritional information is an estimate and may vary.
Frequently Asked Questions
How far in advance can I make Christmas cheese balls?
Cheese balls can be made up to 3 days in advance. Shape and coat them, then wrap each one individually in plastic wrap and refrigerate. The flavors actually improve over time as the Worcestershire sauce and spices permeate the cheese. Unwrap and bring to room temperature 15 minutes before serving.
Can I freeze cheese balls?
Yes, cheese balls freeze beautifully for up to 1 month. Wrap tightly in plastic wrap, then aluminum foil, and place in a freezer bag. Thaw in the refrigerator overnight before serving. Add fresh herb coatings after thawing since the herbs lose their color and texture during freezing. The cranberry pecan and everything bagel coatings freeze well.
Why is my cheese ball too soft to hold its shape?
The cheese mixture was not chilled long enough. Return it to the refrigerator for another 30 minutes. Also make sure your cream cheese was softened to room temperature before mixing — overly warm or melted cream cheese creates a mixture that is too runny even after chilling.
Can I make mini cheese balls instead of three large ones?
Absolutely. Use a tablespoon or cookie scoop to portion the mixture into 1-inch balls, then roll each in the coating of your choice. Mini cheese balls are perfect for individual servings and look adorable on a platter. The recipe makes about 36 mini cheese balls. They also work great on cocktail picks.

Hi, I'm Lisa!
I create simple, tested recipes from around the world that anyone can make at home.
Learn More →Reader Reviews
Based on 256 reviews