World Cuisine
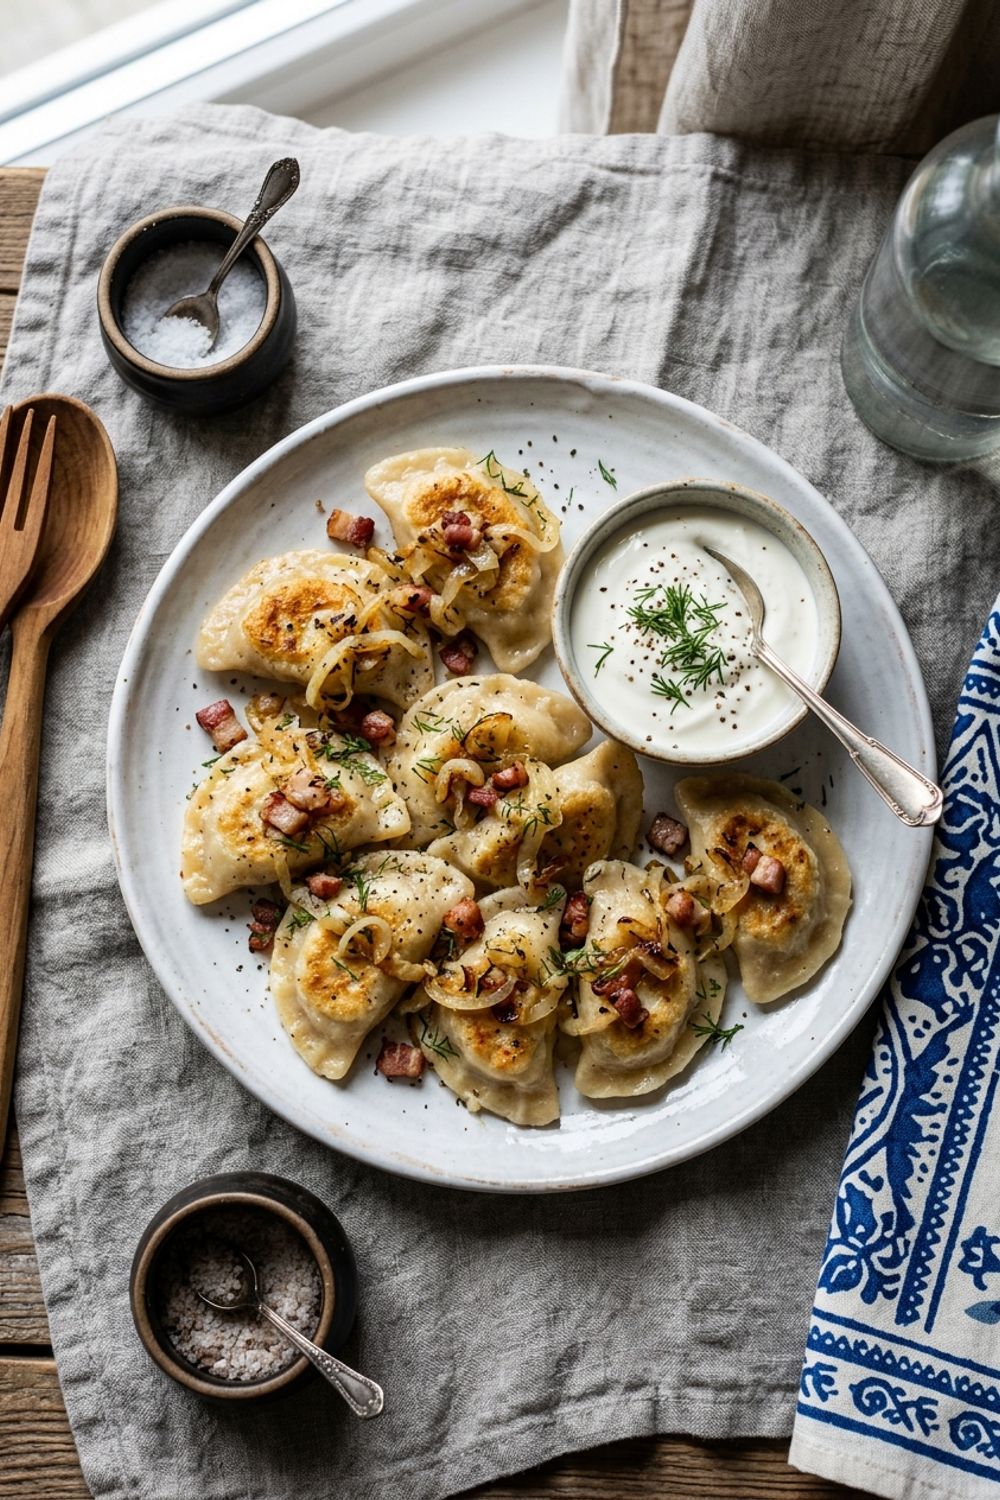
Cabbage Dumplings Polish Style (Pierogi Ruskie)
Why These Polish Cabbage Dumplings Hold a Special Place in My Heart
I discovered pierogi during a bitterly cold winter visit to Krakow, Poland, where a kind elderly woman at a market stall handed me a paper plate piled high with golden, pan-fried dumplings glistening with butter. The first bite stopped me in my tracks — the crispy exterior giving way to a soft, pillowy dough encasing the most beautifully tangy sauerkraut and mushroom filling I had ever tasted. It was pure, unadulterated comfort food, and I knew immediately that I needed to learn how to make these at home.
What sets these Polish cabbage dumplings apart from other dumpling traditions is the incredible depth of flavor in the filling. The combination of sauerkraut and mushrooms creates a savory, slightly acidic center that is perfectly balanced by the mild, tender dough and the rich butter used for frying. Unlike Asian dumplings that tend to be light and delicate, pierogi are heartier and more substantial — the kind of food that warms you from the inside out on a grey winter day.
I have spent years refining this recipe, and the version I am sharing with you today is the result of countless batches, dozens of filling experiments, and advice from three different Polish grandmothers who were generous enough to share their family secrets with me. The dough recipe includes sour cream, which gives it a beautiful tenderness that you simply cannot achieve with water-only doughs. The filling gets its complexity from caraway seeds, which add a distinctly Eastern European character that elevates the humble sauerkraut to something truly special.
Making pierogi is genuinely one of my favorite kitchen activities. There is something deeply satisfying about the rhythmic process of rolling, cutting, filling, and sealing each dumpling by hand. I often invite friends over for pierogi-making parties where we set up an assembly line, open a bottle of wine, and spend a lazy afternoon crafting hundreds of dumplings to freeze for later. It turns cooking into a social event and fills your freezer with weeks of incredible meals.
Mastering the Perfect Pierogi Dough
The dough is the foundation of every great pierogi, and getting it right requires understanding what makes it special. Unlike pasta dough, which aims for firmness and bite, pierogi dough should be incredibly soft, smooth, and pliable. The secret ingredient that makes my dough stand out is the sour cream. It adds fat that tenderizes the gluten strands, resulting in a dough that is strong enough to hold the filling but melts in your mouth when cooked. I have tested this recipe with and without sour cream, and the difference is dramatic — the sour cream version is noticeably more tender and has a subtle richness that plain water dough lacks.
Temperature matters enormously when making pierogi dough. I always use warm water, around 100 to 110 degrees Fahrenheit, because it helps the gluten develop more easily and produces a smoother dough with less kneading. Cold water dough requires significantly more effort to become smooth and tends to spring back aggressively when you try to roll it thin. The warm water also helps dissolve the salt evenly, ensuring consistent seasoning throughout every dumpling.
The resting period is non-negotiable. I know it is tempting to skip this step when you are eager to start filling, but those 30 minutes of rest allow the gluten to relax completely. Without resting, the dough will fight you at every turn — shrinking back when you roll it, tearing when you try to seal the edges, and resulting in tough, chewy dumplings. After resting, the dough should roll out smoothly and effortlessly, almost like working with soft clay. If your dough still springs back after 30 minutes, give it another 15 minutes of rest.
The Secret to an Outstanding Sauerkraut Filling
The filling is where most pierogi recipes succeed or fail, and the biggest mistake I see people make is using sauerkraut straight from the jar without properly preparing it. Raw sauerkraut is too wet and too aggressively sour for a dumpling filling. My technique involves two critical steps: first, squeezing the sauerkraut as dry as humanly possible using a clean kitchen towel, and second, sautéing it slowly to caramelize the natural sugars and mellow the acidity.
When I cook the filling, I start with the onions and mushrooms because they need time to develop flavor before the sauerkraut joins the party. The onions should be truly soft and translucent, not just barely cooked. The mushrooms need to release all their moisture and turn golden — this concentration of flavor is what gives the filling its savory backbone. Only after both vegetables are properly cooked do I add the squeezed sauerkraut and cook everything together until the mixture is dry enough that it holds its shape on a spoon without dripping.
Caraway seeds are my not-so-secret weapon in this filling. These tiny seeds have a distinctive warm, slightly anise-like flavor that is quintessentially Polish and pairs beautifully with sauerkraut. I lightly crush them with the back of a knife before adding them to the pan, which releases their essential oils and distributes their flavor more evenly throughout the filling. If you cannot find caraway seeds, you can substitute a small pinch of ground cumin, though the flavor will be notably different.
Tips for Perfect Polish Pierogi Every Time
Roll the Dough Evenly and Thinly. The ideal thickness for pierogi dough is about 1/8 inch or 3 millimeters. Thicker dough results in dumplings that feel doughy and heavy, while dough that is too thin will tear during filling and burst open during boiling. I use a rolling pin and work from the center outward, rotating the dough a quarter turn with each pass. Keep your work surface and rolling pin lightly floured to prevent sticking, but do not go overboard — too much flour toughens the dough.
Cool the Filling Completely Before Assembling. This is a step that seems obvious but is violated by impatient cooks more often than you would think. Warm filling has two problems: it softens the dough on contact, making it nearly impossible to seal properly, and it creates steam inside the sealed dumpling that can cause blowouts during boiling. I spread my filling on a plate and refrigerate it for 15 minutes before I start assembling. The extra patience pays off in perfectly sealed, intact pierogi every time.
Seal Edges with Extreme Prejudice. A pierogi that opens during boiling is a sad sight — the filling leaches out into the water and you are left with a empty pocket of dough. I seal my pierogi using a three-step method: first, I moisten the edge of the dough circle with a wet finger, then I fold it over and press firmly with my fingers, and finally I crimp the edge with a fork. Some Polish cooks use a specialized pierogi press, but I find that hand-sealing gives me better control and a more consistent result.
Do Not Overcrowd the Pot. When boiling pierogi, they need room to float freely. Overcrowding causes them to stick together and cook unevenly. I never boil more than 8 to 10 at a time in a large pot of water. The water should be at a full rolling boil before the pierogi go in, and I stir gently with a wooden spoon immediately after adding them to prevent sticking to the bottom.
Caramelize Your Onions Properly. The caramelized onion topping is not an afterthought — it is an essential component that provides sweetness and depth. True caramelization takes 15 to 20 minutes over medium-low heat. Do not crank up the heat to rush the process; you will end up with burned, bitter onions instead of sweet, golden ones. Add a pinch of salt at the start to draw out moisture, and stir only occasionally to allow browning to develop between stirs.
Variations to Try
Potato and Cheese Pierogi (Pierogi Ruskie). The most famous pierogi variety uses a filling of mashed potatoes mixed with farmer’s cheese or dry curd cottage cheese. Boil 2 large russet potatoes until tender, mash with 1 cup of farmer’s cheese, season with salt, pepper, and sautéed onions. This creamy, mild filling is the gateway pierogi for those new to Polish cuisine and pairs beautifully with the same caramelized onion and sour cream topping.
Sweet Blueberry Pierogi. In Poland, sweet pierogi are just as beloved as savory ones. Fill the dough circles with fresh or frozen blueberries mixed with a tablespoon of sugar and a teaspoon of cornstarch. Boil as usual, then toss with melted butter and serve dusted with powdered sugar and a drizzle of cream. These are absolutely stunning in summer when blueberries are at their peak sweetness.
Meat Pierogi (Pierogi z Mięsem). For a heartier option, combine finely minced cooked beef or pork with sautéed onions, a tablespoon of breadcrumbs, and seasoning. The meat should be very finely ground or even pulsed in a food processor for the smoothest filling. These are traditionally served with a mushroom gravy and are perfect for colder months when you need something truly substantial.
Spinach and Feta Pierogi. This Mediterranean twist on the classic combines sautéed spinach (squeezed very dry) with crumbled feta cheese, a clove of minced garlic, and a pinch of nutmeg. The salty feta and earthy spinach work surprisingly well inside the tender Polish dough, creating a fusion that bridges Eastern European and Greek culinary traditions.
How to Store Your Pierogi
Fresh pierogi are best eaten the day they are made, but their real magic lies in how beautifully they freeze. To freeze uncooked pierogi, arrange them in a single layer on a parchment-lined baking sheet, making sure none are touching. Freeze for 2 hours until solid, then transfer to freezer bags, removing as much air as possible. They will keep for up to 3 months in the freezer. When ready to cook, boil them directly from frozen — do not thaw first, as this causes the dough to become soggy. Simply add 1 to 2 extra minutes to the boiling time.
Cooked pierogi store well in the refrigerator for up to 3 days in an airtight container. Toss them with a light coating of oil to prevent sticking. To reheat, pan-fry them in butter until crispy and heated through — this is actually the preferred method of eating leftover pierogi in Poland, and many people argue that day-old pan-fried pierogi are even better than freshly boiled ones. I would not disagree with them.
Troubleshooting Your Pierogi
If your dough keeps tearing when you roll it out, it is likely too dry. Wet your hands and knead the dough for another minute, incorporating the moisture gradually. Alternatively, the dough may not have rested long enough — give it another 15 to 20 minutes under the plastic wrap. If the dough is tearing during filling, you are either rolling it too thin or overstuffing the pierogi. Use a scant tablespoon of filling and keep the dough at a consistent 1/8-inch thickness.
If your pierogi are opening during boiling, the edges were not sealed well enough. Make sure to press out all air pockets when folding and use the fork-crimping method for a secure seal. Also check that there is no filling residue on the edges where you are trying to seal — even a tiny bit of oil from the filling will prevent the dough from adhering to itself. If several pierogi are opening, consider moistening the edges more generously with water before sealing.
If your filling is too wet and making the dough soggy, the sauerkraut was not squeezed dry enough. Next time, place the sauerkraut in a clean kitchen towel and wring it out as tightly as possible. You can also cook the filling longer to evaporate additional moisture. The finished filling should hold its shape in a mound on a spoon without any visible liquid.
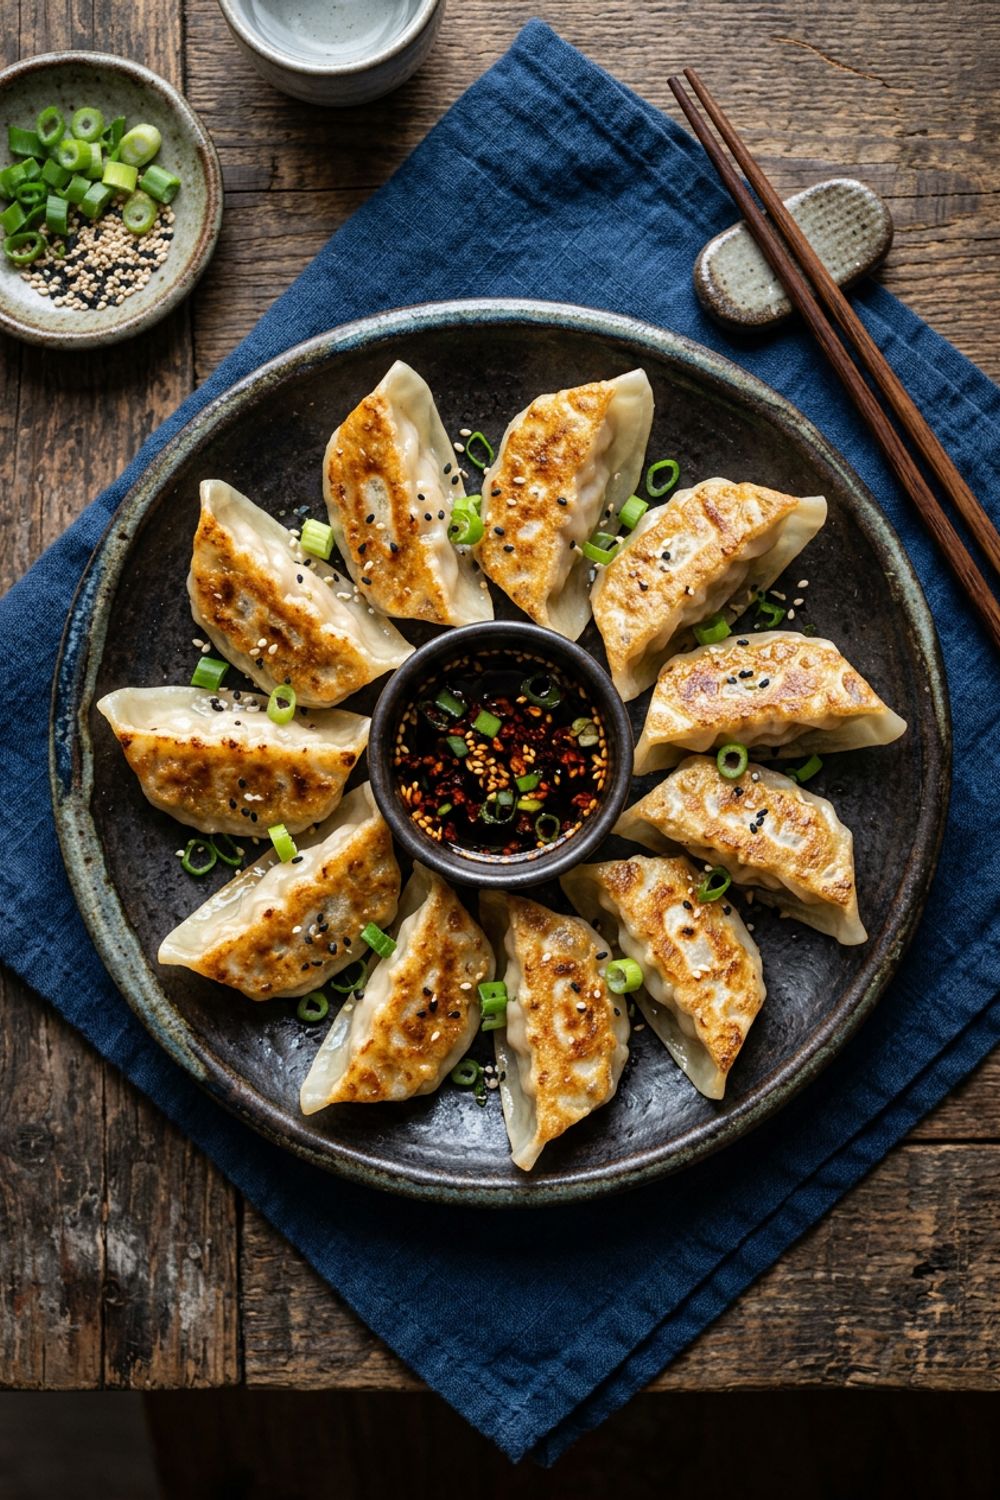
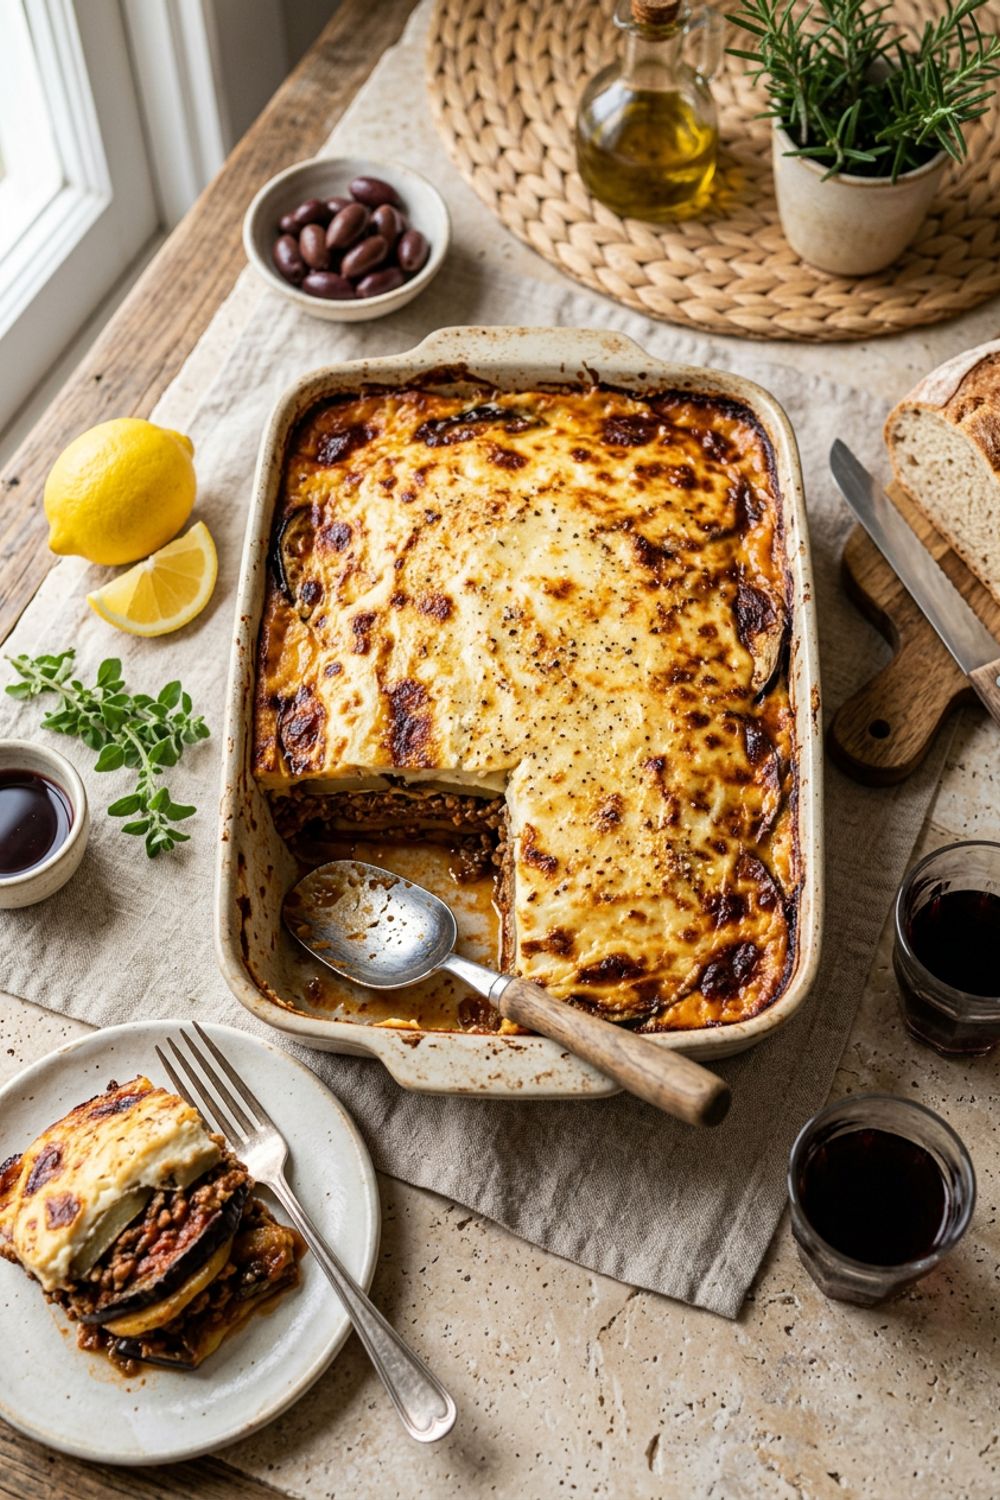
These Polish cabbage dumplings are a labor of love that I guarantee will reward your efforts tenfold. If you enjoy the dumpling-making process, I highly recommend trying my Cabbage Dumplings Gyoza for a Japanese take on the concept. For more hearty European comfort food, my Traditional Greek Moussaka is another crowd-pleaser, and for a rich Indian-inspired meal, do not miss my Creamy Pesto Chicken Pasta.
Never Miss a Recipe
Join 5,000+ home cooks and get new recipes straight to your inbox.
Ingredients
Dough
Filling
Topping
Instructions
- 1
Make the Dough
In a large mixing bowl, combine the flour and salt. Create a well in the center and add the egg, warm water, sour cream, and vegetable oil. Mix with a fork until a shaggy dough forms, then turn out onto a lightly floured surface and knead for 8-10 minutes until smooth and elastic. The dough should be soft but not sticky. Wrap tightly in plastic wrap and rest at room temperature for 30 minutes.
- 2
Prepare the Filling
Heat the butter and vegetable oil in a large skillet over medium heat. Add the diced onion and cook, stirring occasionally, for 5-6 minutes until softened and translucent. Add the diced mushrooms and cook for another 4-5 minutes until they release their moisture and turn golden. Add the squeezed sauerkraut, black pepper, and caraway seeds. Cook, stirring frequently, for 8-10 minutes until the mixture is dry and lightly caramelized. Transfer to a bowl and let cool completely.
- 3
Roll and Cut the Dough
Divide the rested dough in half. On a lightly floured surface, roll one half to about 1/8-inch (3mm) thickness. Using a 3-inch (7.5cm) round cutter or the rim of a glass, cut out circles. Gather the scraps, re-roll, and cut more circles. Repeat with the second half of dough. You should get approximately 30-35 circles.
- 4
Fill and Seal the Pierogi
Place about 1 tablespoon of the cooled filling in the center of each dough circle. Fold the dough in half over the filling to create a half-moon shape. Press the edges firmly to seal, starting from one corner and working to the other while pushing out any air pockets. Crimp the edges with a fork for a decorative seal that also ensures they stay closed during cooking.
- 5
Boil the Pierogi
Bring a large pot of generously salted water to a rolling boil. Working in batches of 8-10, carefully drop the pierogi into the water. Stir gently to prevent sticking. The pierogi will sink to the bottom and then float to the surface after 2-3 minutes. Once they float, cook for an additional 1-2 minutes. Remove with a slotted spoon and transfer to a plate lightly brushed with oil.
- 6
Pan-Fry and Serve
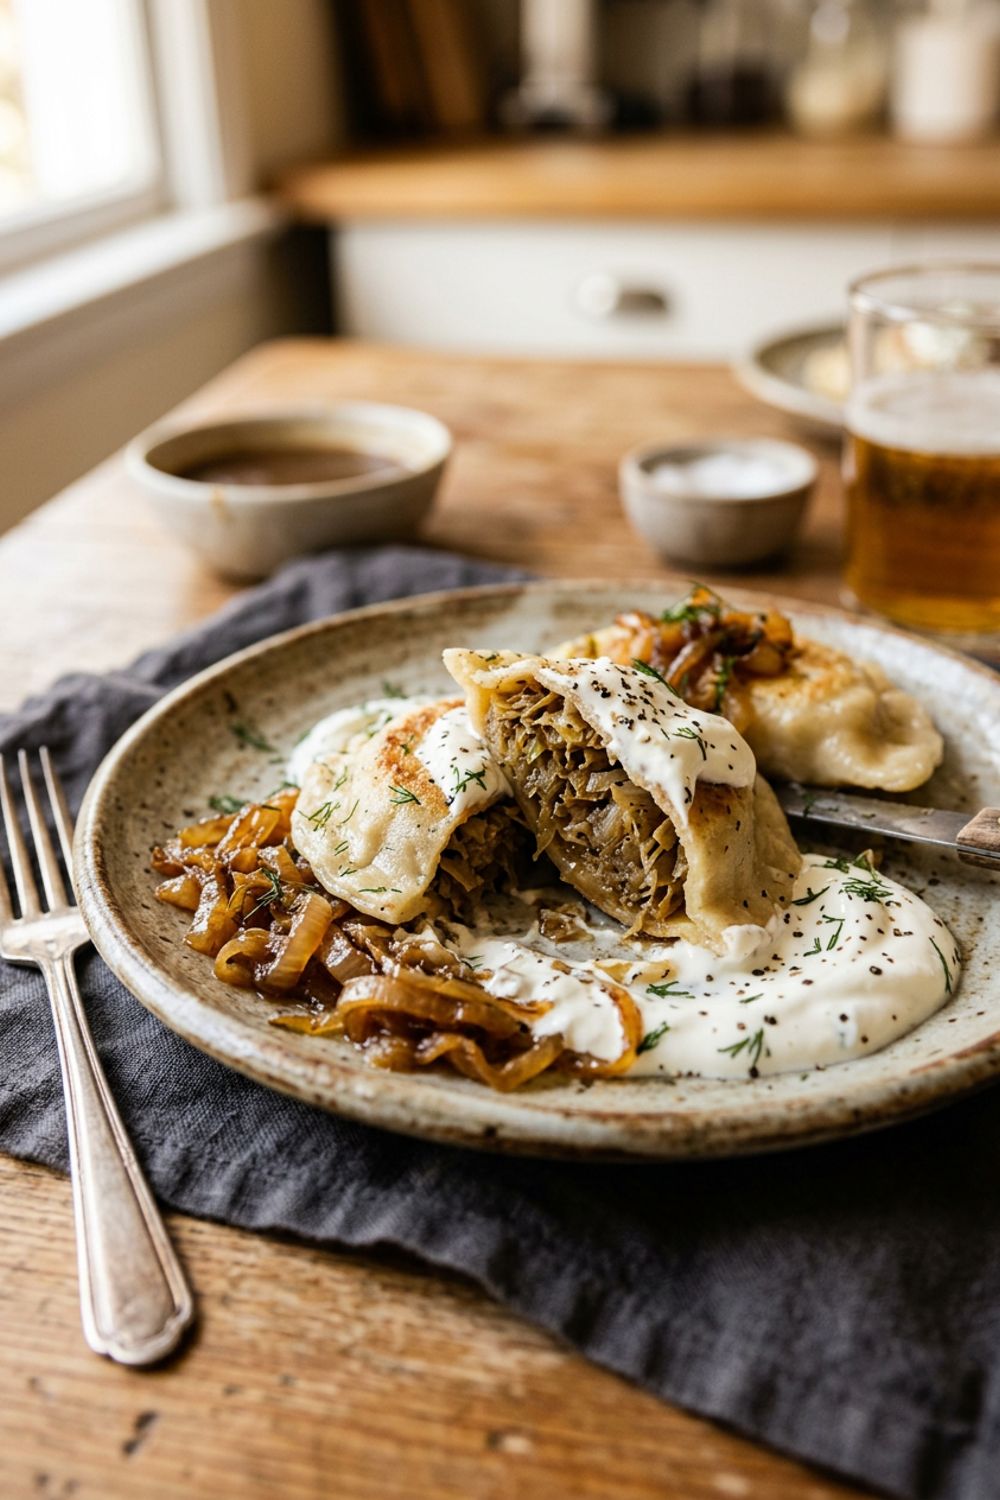
Melt 2 tablespoons of butter in a large non-stick skillet over medium-high heat. Add the boiled pierogi in a single layer and cook for 2-3 minutes per side until golden and crispy. Meanwhile, in a separate pan, caramelize the sliced onions in the remaining 2 tablespoons of butter over medium-low heat for 15-20 minutes, stirring occasionally, until deep golden brown. Serve the pierogi topped with caramelized onions, a dollop of sour cream, and a sprinkle of fresh dill.
Nutrition Information
Per serving (serves 4). Values are approximate.
| Calories | 420 calories |
| Total Fat | 20g |
| Saturated Fat | 10g |
| Carbohydrates | 50g |
| Sugar | 4g |
| Protein | 12g |
| Sodium | 680mg |
| Fiber | 4g |
* Percent Daily Values are based on a 2,000 calorie diet. Your daily values may be higher or lower depending on your calorie needs. Nutritional information is an estimate and may vary.
Frequently Asked Questions
Can I freeze uncooked pierogi?
Absolutely! Arrange the filled, uncooked pierogi in a single layer on a parchment-lined baking sheet and freeze until solid (about 2 hours). Transfer to freezer bags and store for up to 3 months. Cook directly from frozen — just add 1-2 extra minutes to the boiling time.
Why is my pierogi dough too sticky?
If your dough is sticky, add flour one tablespoon at a time while kneading until it becomes smooth and pliable. The sour cream and egg can add varying amounts of moisture, so you may need to adjust. The dough should feel like soft playdough — smooth and slightly tacky but not clinging to your hands.
Can I use fresh cabbage instead of sauerkraut?
Yes, you can shred half a head of green cabbage and sauté it with a pinch of salt until very soft and lightly golden, about 15-20 minutes. The flavor will be milder and sweeter than sauerkraut. Add a tablespoon of white vinegar at the end for a subtle tang.
What is the best way to reheat leftover pierogi?
Pan-frying in butter is the best reheating method. Heat a tablespoon of butter in a skillet over medium heat and cook the pierogi for 2-3 minutes per side until heated through and crispy. Avoid microwaving, as it makes the dough rubbery.

Hi, I'm Lisa!
I create simple, tested recipes from around the world that anyone can make at home.
Learn More →Reader Reviews
Based on 312 reviews